
Introduction
Before moving forward, let’s define some terms:
URL example: https://example.com/post/example-article-1
| Name | Definition |
|---|---|
| baseURL | Actual domain of your blog, here it is https://example.com |
| Permalink | The rest of your post URL excluding your domain |
| Slug | The last portion of the URL, /example-article-1 |
You can manipulate the last two portions of your content URL to make them look clean and shortened.
URL Management
My website URL looked like this:
This is unnecessarily long, and using post title as a URL path.
So, after some coding wizardry, I was able to make them look like this:
Just kidding, it’s a simple configuration change.
Individual Posts
According to Hugo docs1 2, you can modify and change your individual post URL via the frontmatter:
|
|
The post URL will look like this https://example.com/my-beautiful-url
You can choose whatever URL you want for your posts, but keep in mind, they shouldn’t conflict with each other. You might overwrite your pages and some of them won’t appear at all.
Site-wide Configuration
Earlier, my website hugo.yaml file looked liked this:
|
|
I’m using page bundles (Stack Theme), and I want to use the folder title for the specific post as a URL path.
So, I changed the config to:
|
|
This will only show folder name as a URL path, and slice the /p part too. If you want to keep it:
|
|
If you are on Hugo v0.144.0 or above, the filename token is deprecated3, use :contentbasename instead.
Redirects for Old URLs
If you’re just starting with your Hugo journey, you don’t need to do this part, you can skip the rest of the tutorial.
But rest of us, who have shared the old URLs of their posts on multiple social media websites. Doing beautification, will break those older URLs.
To make sure, people from Social Media using older URLs of your posts can still reach the new destination, you need to make some changes in the frontmatter of your posts.
Add aliases of your older permalinks to the frontmatter of each blog:
|
|
Now, one can reach your desired article using both new and old links:
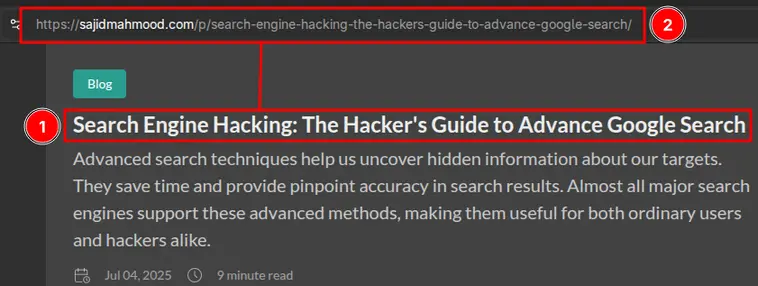
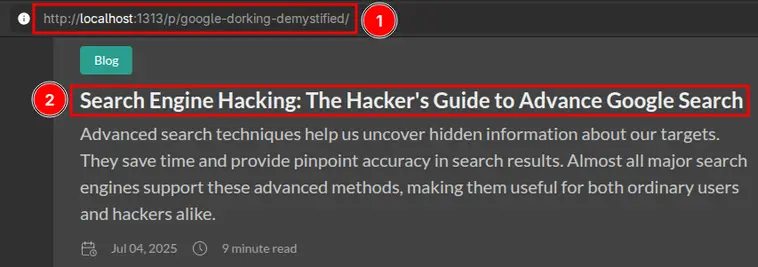
For example, you can reach my blog post Search Engine Hacking: The Hacker’s Guide to Advance Google Search, using the following two links:
Older link: sajidmahmood.com/p/search-engine-hacking-the-hackers-guide-to-advance-google-search
Both totally different links will lead to the same destination.
If you have hundred of blog posts, and want some automation, you can look into _redirects file4. It might work on Netlify and Cloudflare Pages. I haven’t personally tested this redirection method.
-
Configure ugly URLs — Hugo Docs. Learn more ↩︎
-
Harry Creswell, Hugo and redirects — 2021. Learn more ↩︎